JS中步进拖拉拽效果实现,vue3中做课表业务,对课表实现课程时间拖动修改的操作。拖拉拽代码效果实现案例教程。也可对应排班业务。
拖拉拽课表效果展示:
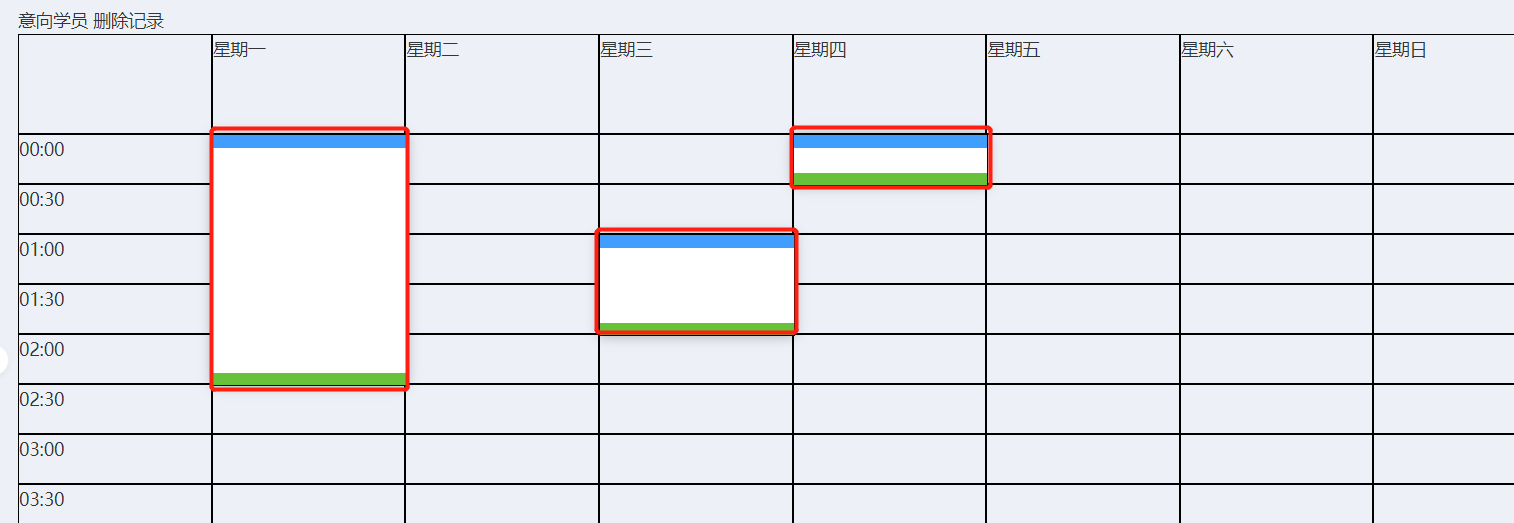
上述案例拖拉拽思路讲解:
1、用grid网格化布局
2、将顶部的8个单元格循环生成,从第二个单元格开始写入星期一到星期日
3、将左侧的时间单元格用数组生成,然后用v-for循环生成到页面中(这里需要使用grid布局,让单元格垂直排列在左侧)
4、让中间用于选择的单元格也用grid排列
5、给格子添加点击事件,当格子被点击时,给对应的格子添加对应的样式,用来表示选中了该单元格(定位,根据盒子距离顶部左边宽高位置定位)
6、在被点击的格子中拿到该单元格的位置(此位置指距离视窗左边,上边的位置信息)
7、获取鼠标点击的位置到移动的位置的距离(鼠标点击、鼠标移动、鼠标离开的事件)
8、在鼠标移动时,通过移动的位置计算对应盒子展示的位置
拖拉拽案例代码实现:
<script setup>
import { ref } from "vue"

const title = [ //定义星期数据
  "星期一",
  "星期二",
  "星期三",
  "星期四",
  "星期五",
  "星期六",
  "星期日",
]
const hours = []  //数组对象,生成左侧时间数据
for (let i = 0; i < 24; i++) {
  const t = i >= 10 ? i : `0${i}` //对个位数的时间补0
  // 以半小时为一格
  hours.push({ //给左侧时间列表push一个对象
    text: `${t}:00`,    //text文本对象时间
    start: i * 2 + 2,   //开始位置
    end: i * 2 + 3,     //结束位置
  })
  hours.push({       //后半个小时时间
    text: `${t}:30`,
    start: i * 2 + 3,  //开始位置
    end: i * 2 + 4,     //结束位置(单元格)
  })
}
const blanks = [] //以半小时计算,一周的总格子数,数组总长度
blanks.length = 48 * 7

// 排课的数组
const classes = ref([])  //排课的课程数组

let container = null //值是整个grid表格div节点
const add = index => { //新增方法,传入格子索引(一共48*7个格子)(对应blanks)
  const row = Math.floor(index / 7) //拿到第几行,一共48行,第一行是0,拿到行数
  const columns = index % 7   //拿到列数,一共7列,取余能拿到列数
  if (!container) return //没有获取到grid节点结束点击事件
  // 元素的宽度,高度,所在的屏幕位置
  const conSize = container.getBoundingClientRect() //包含一个DOMRect对象(宽高和位置信息)
  const blockWidth = conSize.width / 8
  const blockHeight = 40
  const left = blockWidth * (columns + 1)
  const top = blockHeight * (row + 2)
  classes.value.push({
    left,
    top,
    columns,
    row,
    blockWidth,
    blockHeight,
    rows: 1,
    resetRows: 0,
  })
}

let current = { x: 0, y: 0 }

  /* 上下拖动事件 */
const mouseDown = (e, direction, c) => { //三个参数,事件对象、方向、排课的数组对象的参数
  e.preventDefault() //先阻止默认事件
  current = { x: e.clientX, y: e.clientY } //利用事件对象拿到鼠标点击的位置
  const initRows = c.rows
  const initResetRow = c.resetRows
  const mouseMove = e => {
    // 相对于鼠标按下的位置,移动的距离
    const dy = e.clientY - current.y
    const dr = Math.floor(dy / 40)
    if (direction > 0) {
      // 向上移动
      const drt = -dr
      if (initResetRow + drt < 1) {
        return
      }
      c.resetRows = initResetRow + drt
      c.rows = initRows + drt
    }
    if (direction < 0) {
      // 向下移动
      if (initRows + dr < 1) {
        return
      }
      c.rows = initRows + dr
    }
  }
  const mouseUp = () => {
    document.removeEventListener("mousemove", mouseMove)
    document.removeEventListener("mouseup", mouseUp)
  }
  document.addEventListener("mousemove", mouseMove)
  // 清空监听,处理结果
  document.addEventListener("mouseup", mouseUp)
}
</script>

<template>
  <!-- 下面这行代码是将ref这个值保存到container里 -->
  <div :ref="el => (container = el)">
    <!-- 第一空白格 -->
    <div></div>
    <!-- 第二到第八格,内容标题是星期一到星期天 -->
    <div v-for="text in title">{{ text }}</div>
    <!-- 左侧时间格,在grid布局下,设置了左侧布局,因此,垂直于左侧 -->
    <div
      v-for="hour in hours"
      style="grid-column-start: 1; grid-column-end: 2"
      :style="{
        // 从第几行开始,到第几行结束
        gridRowStart: hour.start,
        gridRowEnd: hour.end,
      }">
      {{ hour.text }}
    </div>
    <!-- 中心格子,点击传入格子索引 -->
    <div v-for="(_, index) in blanks" @click="add(index)"></div>
    <!-- 下面是循环出被点击选中的格子 -->
    <div
      v-for="(c, index) in classes"
      :key="index"

      :style="{
        left: c.left + 'px',
        top: c.top - c.resetRows * 40 + 'px',
        width: c.blockWidth + 'px',
        height: c.blockHeight * c.rows + 'px',
      }">
      <div>
        <div @mousedown="mouseDown($event, 1, c)"></div>
        <div @mousedown="mouseDown($event, -1, c)"></div>
      </div>
    </div>
  </div>
</template>

<style scoped>
.class-container {
  position: relative;
  display: grid;
  height: 2000px;
  grid-template-columns: repeat(8, 1fr);
  grid-template-rows: 80px repeat(48, 40px);

  & > * {
    border: 1px solid #000;
  }

  .class-info {
    position: absolute;
    width: 200px;
    height: 200px;
    box-shadow: 0 0 10px rgba(0, 0, 0, 0.3);
    background-color: white;

    .class-content {
      position: relative;
      height: 100%;
      width: 100%;

      .top-bar {
        background-color: #409eff;
        position: absolute;
        left: 0;
        top: 0;
        width: 100%;
        height: 10px;
        cursor: n-resize;
      }

      .bottom-bar {
        background-color: #67c23a;
        position: absolute;
        left: 0;
        bottom: 0;
        width: 100%;
        height: 10px;
        cursor: n-resize;
      }
    }
  }
}
</style>
步进拖拉拽注意事项:
基础版拖拉拽,仅供参考